Code highlighting

Tuesday, November 03, 2020

[Tutorial] Piece by piece receiving process with Advanced Warehouse Management in Dynamics 365 SCM

Introduction

In a recent post (Piece by piece picking process with Advanced Warehouse Management in Dynamics 365 SCM) I described the configuration necessary to allow performing picking in the warehouse by scanning each SKU one by one aka "piece by piece". I suggest you familiarize yourself with this post as I will be re-using the master data setup here. 

In this post, we will be receiving a purchase order with 4 lines, all for DemoShoe product, with similar variants (Size and Color) and quantities, as in the prior example with a sales order. Below you can see the PO lines in full:

Purchase order with 4 lines for DemoShoe

Standard receiving flows like Purchase order item receiving, load item receiving and similar, which receive one purchase order line at a time do not support the piece by piece item entry. 

But there is one mobile device receiving flow that does. It is Mixed License Plate receiving, and below you can see how I have configured it in the application - pretty much a default configuration:

Mixed LP receiving mobile device menu item

Mixed LP receiving is meant for receiving a pallet with mixed items, as described in more detail in our team's blog post. As you can read in the blog post, the initial feature was built with a slightly different purpose, but can be used as well as described in this post.

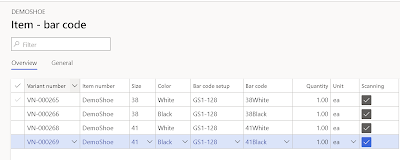
As before, and very important, we need to configure the bar codes for scanning for all the variants. Exactly the same as in the previous post:

Product variant bar code setup for DemoShoe

Flow

1. We start by scanning in a license plate. This will be the license plate we are going to use for putaway, and as such will be set as the target LP on the created work order.

Enter License Plate

2. As Mixed LP receiving allows receiving items from multiple purchase orders, we then need to enter the PO number we are going to be scanning items from. 

Enter Purchase order number

3. Now we have reached the page where we can start scanning in the barcodes. That's exactly what we are going to do, by scanning in 38White, corresponding to 1 unit of the DemoShoe product variant of size 38 and color White.

Scanning the first product variant

4. After scanning the item we do not see any confirmation, but are presented with the same screen, allowing us to scan the next variant barcode, in this case, 38Black.

Scanning the second product variant

5. At any point in time during the process, we can view the list of items already scanned, change PO number to receiving another purchase order, or complete the scanning for current LP, in our case, when it's full and we want to commence putaway operations. 

LP Complete is what we are going to select below, after having scanned a few more items

Mixed LP receiving - Available actions

6. When completing a license plate, we are first presented with an overview of all the items, and we can still edit the list by adjusting the quantities or removing some of the items from the list. 
(Note. Similar activities can be performed from the web client)

Preview of the scanned items before completing LP

7. When we confirm the list by selecting the checkmark action at the bottom of the page, work will be generated for all the scanned purchase order lines with the respective quantities. This will use the same location directives and work templates as when scanning items in the "standard" way.

Note, that this can take some time, more than it does for a single line receipt, as this will be doing the same action N times, for each PO line we scanned. 

Maybe In future versions of Dynamics 365 SCM we will allow you to configure this process to run "deferred", so that the receiving clerk can move on to the next pallet / purchase order

While the process is running, the app will be blocked and the standard progress icon will display, as shown below:

Progress of creating receiving work

8. Once the process is complete, we will be directed to proceed with scanning the next license plate / purchase order information.

We can review the created work order in the Dynamics 365 SCM web client. 
Nothing unusual here, just a regular work order, as you can see below:

Work order for purchase order

Summary

Now you are familiar with "piece by piece" scanning operations on both inbound and outbound side.
In one of the following blog posts we will review the options available when doing inventory counting operations. 

As for now, let us know if this feature is useful for your business. What's missing? 

Anything else that you would like to see described?

Thanks

Wednesday, October 28, 2020

[Tool] Display contents of an X++ container from SQL database field

Almost 15 years ago AndyD from AxForum blew me away with a post that was giving a glimpse into how the X++ containers are stored in the database. 

Ever since then I had a TODO for myself to write a blog post explaining this in detail and covering the various types that can be stored, basically allowing to review the contents of the container from DB without writing X++ code.

Luckily, today is the day! As they say, 


A colleague of mine, Maciej Plaza, has written a stored procedure, that shows the contents of a container stored in a database field. 

Some inspiration was taken from the following blog post too: http://abraaxapta.blogspot.com/2011/06/accessing-dynamics-ax-containers-from.html

Here's an example of how you could use this to see the batch task's infolog message contents:

declare @bin as varbinary(max);

select top(1) @bin = info from batch where recid = <recid>

exec ##PRINT_CONTAINER @bin

Here is how the output looks like:

Browsing the X++ container contents in SQL


Here is the stored proc (Also available as a file in OneDrive):

CREATE PROCEDURE ##PRINT_CONTAINER @container VARBINARY(MAX)
AS
BEGIN
DECLARE @pos AS int;
SET @pos = 1;
DECLARE @offset AS int;
DECLARE @indent as int;
set @indent = 0;
declare @result as varchar(max);
IF SUBSTRING(@container, @pos, 2) = 0x07FD
	BEGIN
	set @result = '<container>' + char(13);
	set @indent = @indent + 2;
	SET @pos = @pos + 2;
	WHILE @indent > 0
		BEGIN
			IF SUBSTRING(@container, @pos, 1) = 0x00 --STRING
				BEGIN
					set @result = @result + replicate(' ', @indent) + '<string>'
					SET @pos = @pos + 1;
					SET @offset = 0;
					declare @string as varchar(max);
					set @string = '';
					WHILE SUBSTRING(@container, @pos + @offset, 2) <> 0x0000
						BEGIN
							SET @string = @string + 
								CHAR(CAST(REVERSE(SUBSTRING(@container, @pos + @offset, 2)) AS binary(2)))
							SET @offset = @offset + 2;
						END
					SET @pos = @pos + @offset + 2;
					set @result = @result + @string + '</string>' + char(13);
				END
			ELSE IF SUBSTRING(@container, @pos, 1) = 0x01 --INT
				BEGIN
					set @result = @result + replicate(' ', @indent) + '<int>'
					SET @pos = @pos + 1;
					declare @int as int;
					SET @int = CAST(CAST(REVERSE(SUBSTRING(@container, @pos, 4)) AS binary(4)) as int);
					SET @pos = @pos + 4;
					set @result = @result + cast(@int as varchar(max)) + '</int>' + char(13);
				END
			ELSE IF SUBSTRING(@container, @pos, 1) = 0x02 --REAL
				BEGIN
					set @result = @result + replicate(' ', @indent) + '<real>'
					SET @pos = @pos + 1;
					DECLARE @temp as binary(8);
					SET @temp = CAST(REVERSE(SUBSTRING(@container, @pos + 2, 8)) AS binary(8));
					DECLARE @val bigint;
					SET @val = 0;
					DECLARE @dec AS int;
					SET @offset = 1;
					WHILE (@offset <= 8)
						BEGIN
							SET @val = (@val * 100) +
								(CAST(SUBSTRING(@temp, @offset, 1) AS int) / 0x10 * 10) +
								(CAST(SUBSTRING(@temp, @offset, 1) AS int) % 0x10);
							SET @offset = @offset + 1;
						END
					WHILE @val <> 0 AND @val % 10 = 0
						SET @val = @val / 10;
					SET @dec = (CAST(SUBSTRING(@container, @pos, 1) AS int) + 0x80) % 0x100;
					declare @real as real;
					SET @real = CAST(@val AS real);
					WHILE @dec >= LEN(CAST(@val AS varchar)) + 0x80
						BEGIN
							SET @real = CAST(@real AS real) * 10.0;
							SET @dec = @dec - 1;
						END
					SET @dec = (CAST(SUBSTRING(@container, @pos, 1) AS int) + 0x80) % 0x100 + 1;
					WHILE @dec < LEN(CAST(@val AS varchar)) + 0x80
						BEGIN
							SET @real = CAST(@real AS real) / 10.0;
							SET @dec = @dec + 1;
						END
					IF SUBSTRING(@container, @pos + 1, 1) = 0x80
						SET @real = 0 - CAST(@real AS real);
					SET @pos = @pos + 10;
					set @result = @result + @real + '</real>' + char(13);
				END
			ELSE IF SUBSTRING(@container, @pos, 1) = 0x03 --DATE
				BEGIN
					set @result = @result + replicate(' ', @indent) + '<date>'
					SET @pos = @pos + 1;
					DECLARE @year char(4);
					DECLARE @month char(2);
					DECLARE @day char(2);
					SET @year = SUBSTRING(@container, @pos, 1) + 1900;
					SET @month = SUBSTRING(@container, @pos + 1, 1) + 1;
					SET @day = SUBSTRING(@container, @pos + 2, 1) + 1;
					IF LEN(@month) < 2
						SET @month = '0' + @month;
					IF LEN(@day) < 2
						SET @day = '0' + @day;
					declare @date as date;
					SET @date = CAST(@year + '-' + @month + '-' + @day AS date);
					SET @pos = @pos + 3;
					set @result = @result + convert(varchar(max), @date) + '</date>' + char(13);
				END
			ELSE IF SUBSTRING(@container, @pos, 1) = 0x04 --ENUM
				BEGIN
					set @result = @result + replicate(' ', @indent) + '<enum>'
					SET @pos = @pos + 1;
					declare @enum as int;
					SET @enum = CAST(SUBSTRING(@container, @pos, 1) AS int);
					SET @pos = @pos + 3;
					set @result = @result + @enum + '</enum>' + char(13);
				END
			ELSE IF SUBSTRING(@container, @pos, 1) = 0x06 --DATETIME
				BEGIN
					set @result = @result + replicate(' ', @indent) + '<datetime>'
					SET @pos = @pos + 1;
					DECLARE @year2 char(4);
					DECLARE @month2 char(2);
					DECLARE @day2 char(2);
					DECLARE @hour char(2);
					DECLARE @min char(2);
					DECLARE @sec char(2);
					SET @year2 = SUBSTRING(@container, @pos, 1) + 1900;
					SET @month2 = SUBSTRING(@container, @pos + 1, 1) + 1;
					SET @day2 = SUBSTRING(@container, @pos + 2, 1) + 1;
					SET @hour = SUBSTRING(@container, @pos + 3, 1) + 0;
					SET @min = SUBSTRING(@container, @pos + 4, 1) + 0;
					SET @sec = SUBSTRING(@container, @pos + 5, 1) + 0;
					IF LEN(@month2) < 2
						SET @month2 = '0' + @month2;
					IF LEN(@day2) < 2
						SET @day2 = '0' + @day2;
					IF LEN(@hour) < 2
						SET @hour = '0' + @hour;
					IF LEN(@min) < 2
						SET @min = '0' + @min;
					IF LEN(@sec) < 2
						SET @sec = '0' + @sec;
					declare @datetime as datetime;
					SET @datetime = CAST(@year2 + '-' + @month2 + '-' + @day2 + ' ' + @hour + ':' + @min + ':' + @sec AS datetime);
					SET @pos = @pos + 12;
					set @result = @result + @datetime + '</datetime>' + char(13);
				END
			ELSE IF SUBSTRING(@container, @pos, 1) = 0x07 --CONTAINER
				BEGIN
					set @result = @result + replicate(' ', @indent) + '<container>' + char(13);
					SET @pos = @pos + 3;
					set @indent = @indent + 2;
				END
			ELSE IF SUBSTRING(@container, @pos, 1) = 0xFF --CONTAINER END
				BEGIN
					SET @pos = @pos + 1;
					set @indent = @indent - 2;
					set @result = @result + replicate(' ', @indent) + '</container>' + char(13);
				END
			ELSE IF SUBSTRING(@container, @pos, 1) = 0x2D --GUID
				BEGIN
					SET @pos = @pos + 1;
					SET @offset = 0;
					declare @guid as uniqueidentifier
					SET @guid = CAST(CAST(
						REVERSE(SUBSTRING(@container, @pos, 4)) +
						REVERSE(SUBSTRING(@container, @pos + 4, 4)) +
						REVERSE(SUBSTRING(@container, @pos + 8, 4)) +
						REVERSE(SUBSTRING(@container, @pos + 12, 4)
					) AS binary(16))AS uniqueidentifier);
					SET @pos = @pos + 16;
					set @result = @result + replicate(' ', @indent) + '<guid>' + cast(@guid as varchar(80)) + '</guid>' + char(13)
				END
			ELSE IF SUBSTRING(@container, @pos, 1) = 0x30 --BLOB
				BEGIN
					SET @pos = @pos + 1;
					SET @offset = CAST(CAST(REVERSE(SUBSTRING(@container, @pos, 4)) AS binary(4)) AS int);
					SET @pos = @pos + 4;
					declare @blob as varbinary(max);
					SET @blob = CAST(SUBSTRING(@container, @pos, @offset) AS varbinary(max));
					SET @pos = @pos + @offset;
					set @result = @result + replicate(' ', @indent) + '<blob>' + CONVERT(VARCHAR(max), @blob, 2) + '</blob>' + char(13);
				END
			ELSE IF SUBSTRING(@container, @pos, 1) = 0x31 --INT64
				BEGIN
					SET @pos = @pos + 1;
					declare @bigint as bigint;
					SET @bigint = CAST(CAST(REVERSE(SUBSTRING(@container, @pos, 8)) AS binary(8)) AS bigint);
					SET @pos = @pos + 8;
					set @result = @result + replicate(' ', @indent) + '<int64>' + cast(@bigint as varchar(max)) + '</int64>' + char(13)
				END
			ELSE IF SUBSTRING(@container, @pos, 1) = 0xFC --ENUMLABEL
				BEGIN
					SET @pos = @pos + 1;
					DECLARE @value int;
					DECLARE @name varchar(40);
					SET @value = SUBSTRING(@container, @pos, 1);
					SET @pos = @pos + 1;
					SET @offset = 0;
					SET @name = '';
					WHILE SUBSTRING(@container, @pos + @offset, 2) <> 0x0000
						BEGIN
							SET @name = CAST(@name AS varchar(40)) + 
								CHAR(CAST(REVERSE(SUBSTRING(@container, @pos + @offset, 2)) AS binary(2)))
							SET @offset = @offset + 2;
						END
					declare @enumlabel as varchar(max);
					SET @enumlabel = CAST(@name + ':' + CAST(@value as varchar(3)) as varchar(44));
					SET @pos = @pos + @offset + 2;
					set @result = @result + replicate(' ', @indent) + '<enumlabel>' + @enumlabel + '</enumlabel>' + char(13)
				END
			ELSE
			begin
			declare @errormsg varchar(max);
			set @errormsg = 'Unexpected type ' + CONVERT(VARCHAR(1000), SUBSTRING(@container, @pos, 1), 2);
			throw 50000, @errormsg, 1;
			end
		END
	END
print @result
END

Hope this helps!

Saturday, October 17, 2020

[Tutorial] Piece by piece picking process with Advanced Warehouse Management in Dynamics 365 SCM

Introduction

We are often asked - is it possible to configure the system to require the workers on the floor to scan each item they are picking, to ensure a more accurate picking operation where multiple same/similar items need to be picked. This is, for example, very common in the Retail industry, or in smaller distribution centers dealing with apparel or footwear. In this blog post I will demonstrate exactly that, so read on.

Let's quickly go over the setup required.

Setup

In this walkthrough, I will be picking a single sales order (This works just as well for Transfer orders), which has 4 sales lines, each for a different quantity of a product variant varying by size and color. For this example, I've chosen to use a product, which represents a box of shoes. Here is how the order looks:

Piece picking sales order
Sales order with 4 lines

DemoShoe is a product master with Size and Color product dimensions, which has the different product variants defined, and is configured to use Advanced warehouse management.
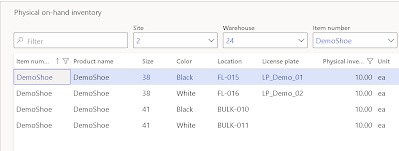
It has sufficient inventory, some in BULK locations, and some in FLOOR locations. The only difference for this example is whether or not the locations are license plate controlled, and does not have any impact on the core scenario.

On-hand availability for DemoShoe

Now, the important bit - since we plan to be scanning in the products one by one, we need to properly define the bar codes for the different product variants. This is shown below:

Product variant bar code setup for DemoShoe

Obviously, you want to define a different bar code for each product variant.

You also need to set the Quantity/Unit pair according to the picking process - in our case, since we want to be picking one box of shoes with each scan, it will be 1 ea. 

And, very important, you need to enable this bar code for scanning, so that it'll get used when we scan in the value on the mobile device. 

Note. The Scanning field is usually shown on the General tab, I've personalized the page to show it in the grid just for convenience of the screenshot.


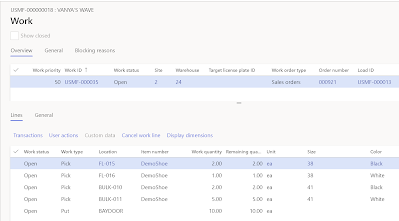
After we release the sales order to warehouse (the configuration for this is not relevant for the demo), we get the following work order generated.

Work order for DemoShoes

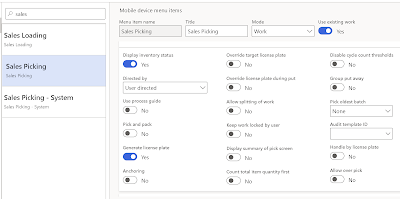
For processing this work, we will use a standard User directed mobile device menu item. It is configured to generate the target license plate, but that's irrelevant for the demo. 

Mobile device menu item for sales order picking

What is important however is to configure the work confirmation for this menu item, enabling the Piece picking option, as shown below.

Here, I have specified that a maximum of 4 piece picking scans will be required, but if I need to pick more, I can just enter the remaining quantity in full instead. 

I have also enabled location confirmation, and product confirmation is enabled automatically with piece picking (the product confirmation field is the one used to scan in each product variant bar code).

Work confirmation for Pick operation

Flow

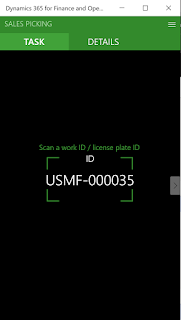
1. We start by scanning in the ID of the work order

1. Work ID


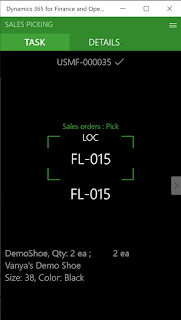
2. We are asked to pick the first work line, and start by confirming we have indeed reached the needed location, FL-015

2. Location confirmation

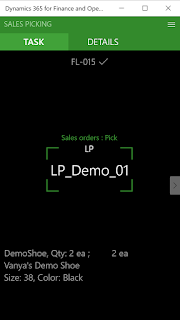
3. As FL-015 is a License plate tracked location, we need to scan in the license plate we are picking from, in this case, LP_Demo_01

3. License plate scan

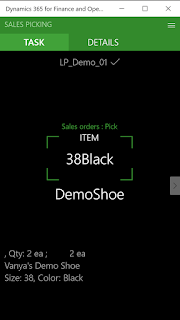
4. Now is when we reach the product confirmation screen, and where the magic starts. 
We scan in the bar code for the correct variant, 38 Black

4. Picking first shoe box

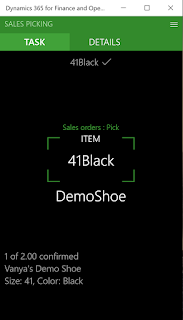
5. We are brought back to the same screen again, asking us to scan in the product. 
However, if we go to the details tab, we can see something has changed. 
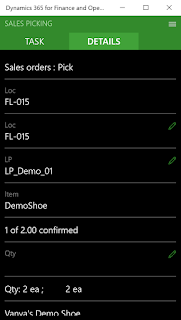
We have now 1 of 2.00 confirmed
That means our input was in fact registered, and we just need to keep scanning the next variant of the 2 required.

5. Piece picking in action - qty confirmed

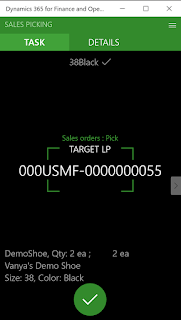
6. We scan in the second box of 38 Black shoes, and are directed to specify the Target LP we are going to move the items on. In this case, it's automatically generated based on menu item setup, so we just confirm.

6. Target LP

Now, you might have noticed, that the data shown on the main screen wasn't super helpful for us, as we did not immediately at a glance see how many items we have already scan-confirmed. Maybe not an issue, but for the purpose of the demo, let's adjust it, so that the piece picking quantity confirmation is more prominent. 

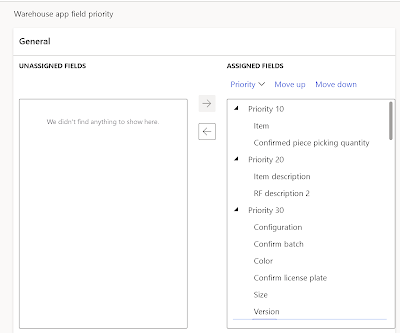
We can do this by modifying the display priority of the corresponding fields in the Warehouse app field priority form. An example is shown below

Mobile app field priority higher for piece pick qty

I have kept the item description and product dimensions high enough to help visually confirm the size and color of the product being picked.

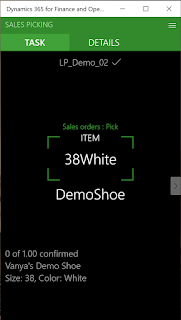
7. With that out of the way, let's re-enter the picking flow and observe the updated main screen information, when picking the second work line. I've skipped location and license plate confirmation screens

7. New visual for piece picking

8. Now we've reached picking from a non license plate tracked BULK location. The process is exactly the same, minus the scan of the license plate to pick from.

8. Piece picking from a BULK location

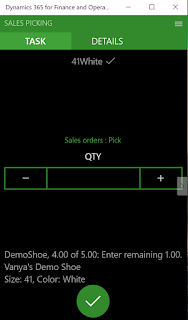
9. You might have noticed that the last work line was for a total quantity of 5 pairs of 41 White shoes. 

This exceeds the maximum set during work confirmation, meaning that I am redirected to a different screen after scanning 4 pairs, where I need to enter the remaining quantity using a standard quantity field instead.

Now, 4 is an arbitrary number I set as maximum for this demo. In reality, most will probably have this higher, only to account for certain really larger volume picks.

9. Remaining picking quantity exceeding max piece picking qty

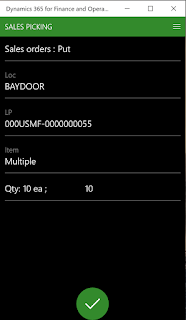
10. Once the remaining quantity is entered (in our case it was just 1 remaining item), all the picks are complete, and we are directed to do the Put of all 10 pairs of shoes we picked.

10. Put to Baydoor

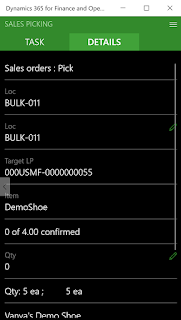
Note that at any point in time in the process, we could switch to the Details tab and manually enter the picking quantity by selecting the little edit icon next to Qty

This is in a way a back door, so I do not recommend that you use it, but thought I would mention it, also to get feedback on how useful this is, and if that's something your company uses on a frequent basis.

Backdoor - Edit Qty field

Summary

That's it. Now you're a master of piece by piece picking in shipping operations when Advanced Warehouse management is used. 

Does this functionality meet the mark? Let us know how you use it and if anything is missing!


In the next post we'll discuss what options are available for piece by piece scans in the receiving warehouse process.

Tuesday, July 14, 2020

Flights vs Feature management - practical overview

Terminology

The primary purpose of flights and features both is to implement a controlled roll-out of new functionality into the product, so as not to disrupt existing business operations. One of Microsoft's primary goals with OneVersion is to ensure we do not break anyone.

By their nature, both the flights and the features are transient in nature, i.e., they will be removed from the product after some time, leaving the new functional behavior as default going forward.

Let's now break it down a bit more, looking closer at what a flight is, and what a feature is, and who has control over them, and when they are enabled/disabled.
  • A flight is a switch, which controls a certain, usually small, piece of business logic in the product, leading it one way or the other. Microsoft is in control of the state of the flight for customers in PROD. The decision to enable or disable a flight, as long as that does not impact the functionality of the environment, is not initiated by the company in most cases. Flights are, generally speaking, always OFF by default.
  • A toggle is a business logic / X++ construct, that is typically based on flights. Similar to flights, it is either On or Off. So what's interesting here is what the default out of the box state of the toggle is.
    • An "enabled by default" toggle, or, as it's more commonly known, a Kill Switch, is used for smaller changes, and the product behavior is changed right away, with no additional action from the users. Kill switches is a way for Microsoft to introduce bug fixes, yet safeguard against potential functional regressions, and as such, ensure we do not break anyone. If controlled by a flight, enabling the flight would turn the toggle and the new behavior off. Example: WHSShipmentConsolidationLoadLineLoadIdToggle
      • A kill switch will get removed after around a year from the moment of introduction, making the new behavior apply to everyone always from then on. 
    • A "disabled by default" toggle is used much less frequently
      • To enable certain troubleshooting logic that is performance intensive and thus undesirable in PROD. Example: WHSInventOnHandForLevelCalculatorMissingSiteIdLogToggle
      • To hide incomplete or work-in-progress features, so they cannot be enabled in PROD. Examle: WHSDockInventoryManagementFeature
      • Enabling the flight would mean enabling the toggle
  • A feature is, in a similar way, a toggle, which controls a usually larger piece of business logic, and is typically controlled by the superusers in the company. For this, they use the Feature management dashboard. Example: WHSWaveLabelPrintingFeature
    • Features go through a life cycle, where they are
      • In Development
        • Not available for use by end users in PROD
      • Private preview
        • Available for use by end users, including in PROD, but only based on prior agreement with Microsoft
        • Linked to a flight, which Microsoft needs to enable for the feature to appear
      • Public preview
        • Available for use by end users in PROD, based on decision to enable and configure the feature by superusers.
      • Generally available / Released
        • This is now the default behavior of the system, everyone has it. Depending on the feature, can still be configured "off".
    • There are corresponding kill switches in place to disable new feature behavior if a severe issue is discovered with the feature. Only reserved for very rare cases.
    • You can read more about Feature management here.

In an ideal world, partners/superusers should not need to know/worry about flights, and should control the behavior of the system solely through the Feature management dashboard. 

All of the above applies to PROD environments. The story with DEV/UAT environments is a bit different today for flights, where the partner/superuser has much more control. 

Note. Self-Service Deployment environments are controlled a bit differently, where above is also true for UAT type environments.

DEV / UAT environments

You can control the state of flights through the SysFlighting table. This is sometimes referred to as "static flighting". 
It's nicely described in an old post I found here, so I'll just paste the one line SQL statement you can use here instead:

INSERT INTO dbo.SYSFLIGHTING(FLIGHTNAME, ENABLED, FLIGHTSERVICEID) VALUES ('', 1, 12719367)

It's really as simple as that, but remember to evaluate, if the toggle is enabled by default or disabled by default before you start adding flights there. Maybe the logic is already doing what you want.

Tip For Inventory, Warehouse and Transportation toggles it is very easy, as you can see it from the name of the class the toggle extends from:

  • WHSEnabledByDefaultToggle
  • WHSDisabledByDefaultToggle

FAQ / Typical scenarios

I enabled the flight in UAT/GOLD by inserting into SysFlighting, but when going live, the flight in PROD is not enabled. Microsoft, please insert the record for me.

Flights in PROD are controlled in a completely different way, not through the SysFlighting table, and are also not enabled on customer's request, but only when it makes sense after evaluation by Microsoft.

Important. You should not expect that just because you turned on a flight in UAT/DEV, and liked what you saw, you'll get the same in PROD. Microsoft can reject your request for enabling particular flighted (private preview) behavior in your PROD environment.

If you discovered what you believe to be a functional or performance regression, and you managed to link it to a particular kill switch, please log a support request with detailed repro steps, so Microsoft can evaluate and fix. We will then typically enable the corresponding flight to mitigate short term.

I'm trying to disable a flight but it's not working. I inserted a row in SysFlighting and marked it as Enabled=0, but system still behaves in the same way as before

Flights are, generally speaking, only Enabled. So it just really depends on what kind of toggle this is in X++. If this is a "kill switch", enabling the flight will revert the behavior to how it was before the changes. If this is a private preview feature, enabling the flight will enable the new behavior (or simply show the feature in the Feature management dashboard)

This is easy to understand if you look at the actual implementation in the WHSEnabledByDefaultToggle class.
public boolean isEnabled()
{
    ...         
    if (flightName == carbonFlightName)
    {
        return !isFlightEnabled(flightName);
    }
    ...
}

This is basically reversing the condition for the flight. Meaning, enabling the flight will disable the toggle.

I enabled a feature, but I did not mean to, and now I cannot disable it

Some features are indeed designed in a way, where it is not allowed to disable them. The common reason here is that as part of enabling this feature, or as a result of using the feature for a short time, data was modified, which makes it difficult to revert to the old behavior. 

Also, not all features have a separate dedicated configuration switch in the product, so after you enable the feature, the product will in most cases start behaving in a different way.

So please carefully read the description of the feature, as well as evaluate the consequences of enabling it in UAT, before enabling it in PROD.

Microsoft enabled a private preview feature flight for me, but I still cannot see the feature in Feature management dashboard

Make sure you have clicked on "Check for updates" in the dashboard after 10-15 minutes after the flight was enabled.

Tip Microsoft also has a way of checking if the flight / feature is evaluated as On or Off for a specific environment, which can help you troubleshoot any issues, if it comes to that.

What is the difference between a Feature and regular Module parameters? For example, a Feature in HR - "Filter active positions" (This feature enables a position list filtered to only active positions). Why it is not an HR module parameter?

A feature is meant for controlling the roll-out of functionality, while a configuration parameter is meant for allowing the user flexibility in setting up their system. 

In the specific example above the intention with the "Filter active positions" feature is to expose it to all users (it's available in Feature management dashboard for everyone to see and enable), but in a manner which would not introduce new menu items / forms until this explicit decision is taken by the superuser, so as to ensure any documentation and internal task guides are properly updated beforehand. It is NOT the intention to make this behavior configurable going forward, and all companies will have access to the relevant menu item eventually (note, how the new FeatureClass property is set on it accordingly), while the feature class will be removed from the product. This approach also allows Microsoft to simplify the product, avoiding addition of unnecessary parameters.

That is not to say that both cannot co-exist. A module parameter or even whole new configuration screens can be added for proper setup of a new feature. They will only be exposed to the end users once the feature is enabled in Feature management. But then for the feature to function according to business expectations one or more settings need to be configured. An example of this is WHSShipConsolidationPolicyFeature feature, which you need to configure after enabling by setting up Shipment consolidation policies in the corresponding form.

More questions?

Please leave comments below, and I'll try to clarify!