Introduction
We are often asked - is it possible to configure the system to require the workers on the floor to scan each item they are picking, to ensure a more accurate picking operation where multiple same/similar items need to be picked. This is, for example, very common in the Retail industry, or in smaller distribution centers dealing with apparel or footwear. In this blog post I will demonstrate exactly that, so read on.
Let's quickly go over the setup required.
Setup
In this walkthrough, I will be picking a single sales order (This works just as well for Transfer orders), which has 4 sales lines, each for a different quantity of a product variant varying by size and color. For this example, I've chosen to use a product, which represents a box of shoes. Here is how the order looks:
 |
Sales order with 4 lines
|
DemoShoe is a product master with Size and Color product dimensions, which has the different product variants defined, and is configured to use Advanced warehouse management.
It has sufficient inventory, some in BULK locations, and some in FLOOR locations. The only difference for this example is whether or not the locations are license plate controlled, and does not have any impact on the core scenario.
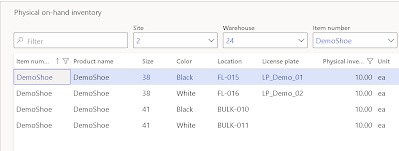 |
On-hand availability for DemoShoe
|
Now, the important bit - since we plan to be scanning in the products one by one, we need to properly define the bar codes for the different product variants. This is shown below:
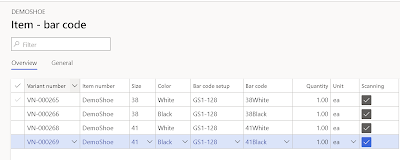 |
Product variant bar code setup for DemoShoe
|
Obviously, you want to define a different bar code for each product variant.
You also need to set the Quantity/Unit pair according to the picking process - in our case, since we want to be picking one box of shoes with each scan, it will be 1 ea.
And, very important, you need to enable this bar code for scanning, so that it'll get used when we scan in the value on the mobile device.
Note. The Scanning field is usually shown on the General tab, I've personalized the page to show it in the grid just for convenience of the screenshot.
After we release the sales order to warehouse (the configuration for this is not relevant for the demo), we get the following work order generated.
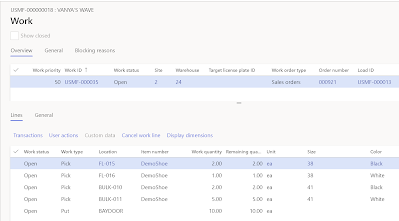 |
Work order for DemoShoes
|
For processing this work, we will use a standard User directed mobile device menu item. It is configured to generate the target license plate, but that's irrelevant for the demo.
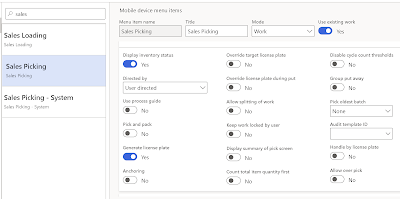 |
Mobile device menu item for sales order picking
|
What is important however is to configure the work confirmation for this menu item, enabling the Piece picking option, as shown below.
Here, I have specified that a maximum of 4 piece picking scans will be required, but if I need to pick more, I can just enter the remaining quantity in full instead.
I have also enabled location confirmation, and product confirmation is enabled automatically with piece picking (the product confirmation field is the one used to scan in each product variant bar code).
 |
Work confirmation for Pick operation
|
Flow
1. We start by scanning in the ID of the work order
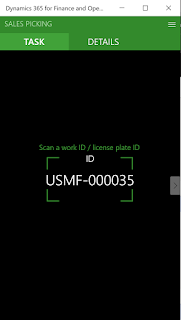 |
1. Work ID
|
2. We are asked to pick the first work line, and start by confirming we have indeed reached the needed location, FL-015
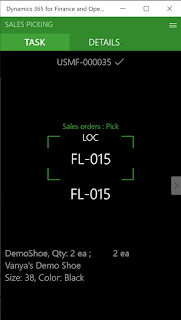 |
2. Location confirmation
|
3. As FL-015 is a License plate tracked location, we need to scan in the license plate we are picking from, in this case, LP_Demo_01
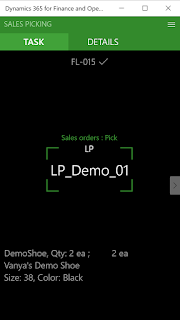 |
3. License plate scan
|
4. Now is when we reach the product confirmation screen, and where the magic starts.
We scan in the bar code for the correct variant, 38 Black
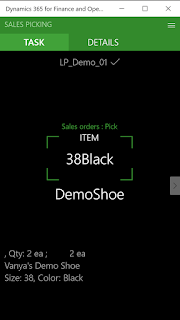 |
4. Picking first shoe box
|
5. We are brought back to the same screen again, asking us to scan in the product.
However, if we go to the details tab, we can see something has changed.
We have now 1 of 2.00 confirmed
That means our input was in fact registered, and we just need to keep scanning the next variant of the 2 required.
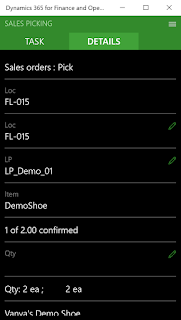 |
5. Piece picking in action - qty confirmed
|
6. We scan in the second box of 38 Black shoes, and are directed to specify the Target LP we are going to move the items on. In this case, it's automatically generated based on menu item setup, so we just confirm.
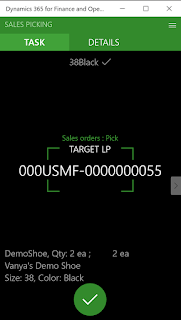 |
6. Target LP
|
Now, you might have noticed, that the data shown on the main screen wasn't super helpful for us, as we did not immediately at a glance see how many items we have already scan-confirmed. Maybe not an issue, but for the purpose of the demo, let's adjust it, so that the piece picking quantity confirmation is more prominent.
We can do this by modifying the display priority of the corresponding fields in the Warehouse app field priority form. An example is shown below
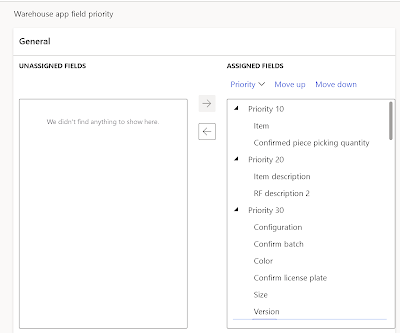 |
Mobile app field priority higher for piece pick qty
|
I have kept the item description and product dimensions high enough to help visually confirm the size and color of the product being picked.
7. With that out of the way, let's re-enter the picking flow and observe the updated main screen information, when picking the second work line. I've skipped location and license plate confirmation screens
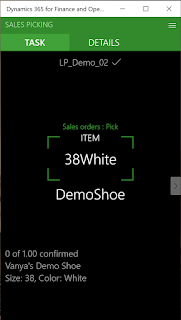 |
7. New visual for piece picking
|
8. Now we've reached picking from a non license plate tracked BULK location. The process is exactly the same, minus the scan of the license plate to pick from.
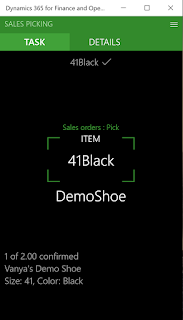 |
8. Piece picking from a BULK location
|
9. You might have noticed that the last work line was for a total quantity of 5 pairs of
41 White shoes.
This exceeds the maximum set during work confirmation, meaning that I am redirected to a different screen after scanning 4 pairs, where I need to enter the remaining quantity using a standard quantity field instead.
Now, 4 is an arbitrary number I set as maximum for this demo. In reality, most will probably have this higher, only to account for certain really larger volume picks.
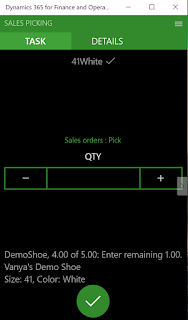 |
9. Remaining picking quantity exceeding max piece picking qty
|
10. Once the remaining quantity is entered (in our case it was just 1 remaining item), all the picks are complete, and we are directed to do the Put of all 10 pairs of shoes we picked.
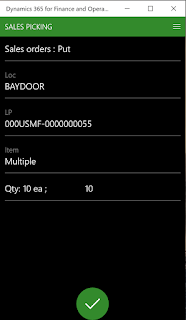 |
10. Put to Baydoor
|
Note that at any point in time in the process, we could switch to the Details tab and manually enter the picking quantity by selecting the little edit icon next to Qty
This is in a way a back door, so I do not recommend that you use it, but thought I would mention it, also to get feedback on how useful this is, and if that's something your company uses on a frequent basis.
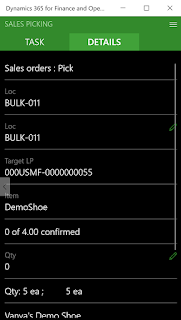 |
Backdoor - Edit Qty field
|
Summary
That's it. Now you're a master of piece by piece picking in shipping operations when Advanced Warehouse management is used.
Does this functionality meet the mark? Let us know how you use it and if anything is missing!
In the next post we'll discuss what options are available for piece by piece scans in the receiving warehouse process.


Love it, thank you
ReplyDeleteGreat - thx
ReplyDeleteThank you! great article. one question though i hope you can help with. so let's say we've done your setup, what if the variant barcode is damaged and unreadable. I can't find a way on the Sales Picking for the user to input the master item number, it says 'product or variant not on Order'.
ReplyDeleteon purchase recieving, the user is able to input the master item number and then it asks user to confirm the variant. however, this is not the same on the sales picking. not sure if that is clear :-)
it seems to be on Purchase recieving on the wms you can input item code and confirm variant, but this is not possible on the outbound picking.
hoping you have some guidance. thank you again for the great article