This is something we have created as a demo for Tech Conf a while back, and you can still see the recording where Per and Zach from our team showcases the different label printing scenarios.
You can view the different Microsoft conference videos here.
Just as a refresher, here is a guide for how to set up label printing in Dynamics AX 7:
http://kashperuk.blogspot.dk/2016/10/tutorial-label-printing-in-microsoft.html
Technical introduction
The label printing "framework" consists of three main components:- WHSLicensePlateLabel table, which contains the information for the label, which is substituted into the label through the variables.
- WHSLicensePlateLabelBuild class, which is responsible for populating the WHSLicensePlateLabel table with data for a particular work order (line).
- WHSDocumentRouting class, which is responsible for the actual printing of the label, as well as the substitution of variable values, using the below methods:
- initMenuFields() method is responsible for building the list of substitute fields based on the WHSLicensePlateLabel table fields
- printDocument() method finds the specific document routing record that matches the flow criteria (e.g., warehouse, work order type, carrier, etc.), performs the translation of the label and sends it to the selected printer (Note that the label can be printed to multiple printers and you can for each printer decide, which layout to use).
- translate() method is responsible for actually replacing any variables in the label layout with the corresponding values from the WHSLicensePlateLabel table
Let's take a closer look at the fields available on the WHSLicensePlateLabel table:
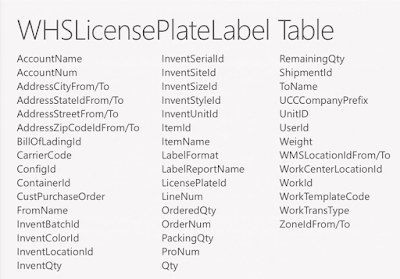 |
| WHSLicensePlateLabel table fields |
These fields represent the full list of potential variables that can be put into the label in the Document Routing layout. Depending on the item flow, some of these fields are not populated. Note that when setting up the placeholders in the Document Routing Layout form, only visible fields are displayed. That allows for storing some "plumbing" information for each record, like the PrinterSettings.
Fragile Example extension
For some scenarios you might want to display some additional fields on the label, which are not part of the list shown above.
Imagine a scenario where we want to display a "Fragile" message on the label if the items on the work line are accordingly marked.
Since there is no such field in the label, we will need to extend this functionality. And because we are working in AX 7, we will try to use Extension instead of Overlayering the elements, as we would do in AX 2012 R3.
Step 0 - Create a new model for our changes
First of all, let's create a new model, which will contain all the elements we add through extension.
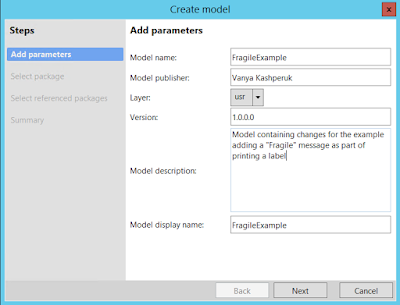 |
| Create a new model in Visual Studio |
We will put this model into a new package, as we do not intent to overlayer existing AOT elements. We will reference the Application Suite package, so that we can access the elements defined in it, such as the ones mentioned above.
Note that by default the new package will also reference Application Platform.
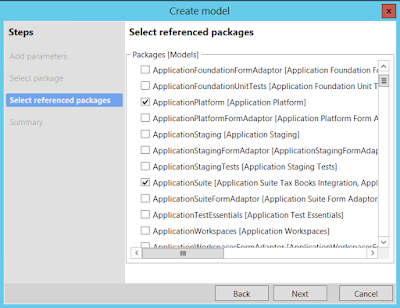 |
| Select referenced packages for model FragileExample |
Confirm the creation of the new model and create a new project for it. Name it FragileExample.
Step 1 - Extend the WHSLicensePlateLabel table and add a new field FragileCode
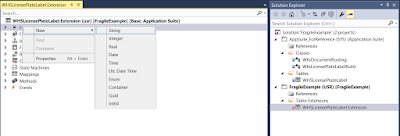
Since we want to display an extra field in the label, we need to add it to the WHSLicensePlateLabel table. In order to do that, let's create an extension of this table in the new model:
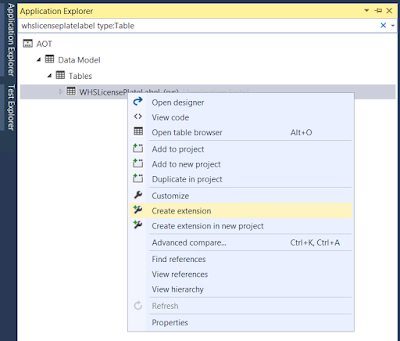 |
| Adding a new table extension from Application Explorer |
We are now going to add a new field of base type String, and call it FragileCode with the corresponding label.
Note I am not going to bother with labels or Extended Data types for sake of simplifying the demo
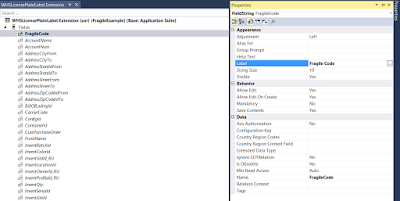 |
| New field FragileCode on table extension WHSLicensePlateLabel.Extension |
In order for the field to appear in the Document routing layouts form all we need to do is compile the new code and synchronize it against the database. I have decided to do that at build time by configuring it accordingly, as shown below:
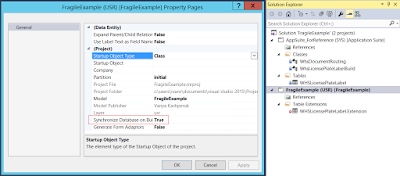 |
| Synchronize on build = true for FragileExample project |
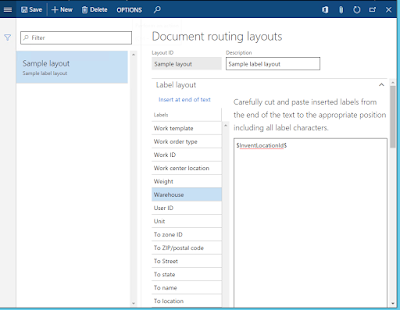
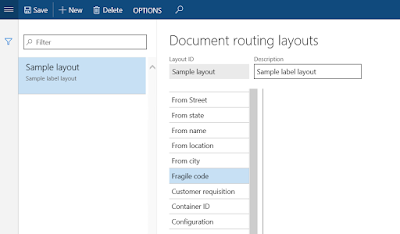
If we now reopen the Document routing layouts form, we can see that our new placeholder is available in the list and we can add it to the label:
Step 2 - Populating the Fragile code field on WHSLicensePlateLabel record
Now that we have the field available on the label, we need to populate it.
As described in the Technical information section above, the label details are populated in the class WHSLicensePlateLabelBuild. Let's quickly examine how this happens:
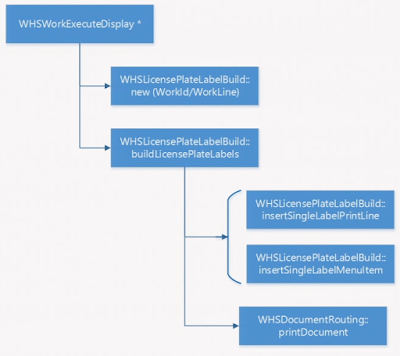 |
| Sequence of calls to build a license plate label |
As you all know, any and all work creation and execution in Dynamics AX happens through the WHSWorkExecuteDisplay* classes, e.g., purchase order registration can execute WHSWorkExecuteDisplayPOItemReceiving, while general work execution flows can execute WHSWorkExecuteDisplayUserDirected, etc.
Within these classes the WHSLicensePlateLabelBuild class is initialized, and the buildLicensePlateLabels() public method is called, when a label needs to be generated and printed.
Depending on the flow, either the insertSingleLabelPrintLine or the insertSingleLabelMenuItem method will be invoked internally, after which the generated label is printed through the printDocument API of the WHSDocumentRouting class, as described above.
Note. insertSingleLabelPrintLine supports the flow where the Print step is part of the work template lines, while insertSingleLabelMenuItem is for the case, where the Print is configured through the mobile device menu item.
So, in order for us to populate the extra new field we need to look into these insert* methods. With the recent AX 2012 R3 changes these methods have been refactored in a way, where most of the logic for populating the WHSLicensePlateLabel table has been pulled out into a new private initLabel() method.
In Dynamics AX 7 this method has been extended (who could have done that? :)) and now has a delegate which is invoked at the end of the method, which means that event handlers can be created for it. With these minor changes, we can now extend this class by subscribing to the event of the initLabel method being invoked, as shown below:
We can now put this generated event handler signature into a new class in our model, as shown below:
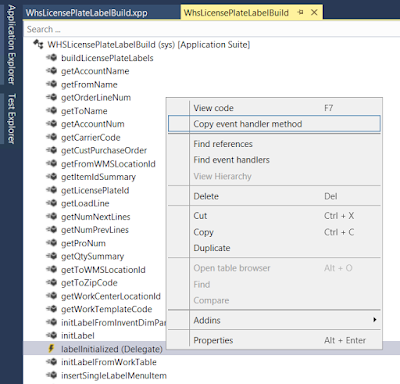 |
| Copy event handler code for labelInitialized delegate |
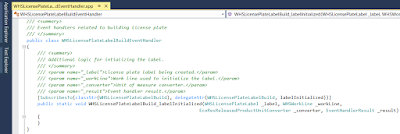 |
| Signature of the event handling method for labelInitialized delegate |
As you can see, instead I have a SubscribesTo attribute that subscribes me to the corresponding event in a static fashion.
Now all we need to do is actually populate the Fragile code on the label. Let's do that:
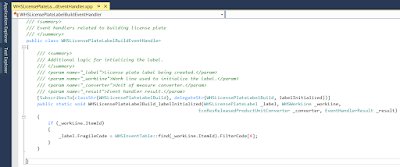 |
| Implementation for the event handling method for labelInitialized delegate |
Let's now compile everything and give it a go in AX web client.
You can download the VS project file from my OneDrive here.
AX flow steps and result
- Modify item A0001, setting Filter Code 4 to a new value called FRAGILE
- Create a new purchase order for 10 pcs of A0001 to WH 24
- Modify the Mobile device menu item for Purchase receipt to "Print label"
- Ensure you have a Document routing record matching WH 24 for Purchase orders
- Ensure you have a document routing layout being sent to a label printer
- Receive the above purchase order through the WMDP
As a result, you should get a new label created, which will have the Fragile code populated with the value FRAGILE, as below (I've personalized the form to show the new field):
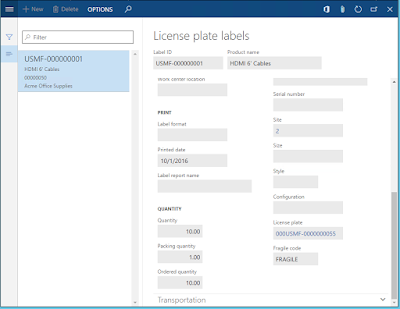 |
| License plate label with the populated Fragile code |
Depending on your label layout you would have this message printed on the label as well.
Conclusion
With this blog post I hoped to show you how to extend the existing set of fields available on the license plate labels.
At the same time we took a look at some of the new language constructs, design paradigms and tooling that allows for a much cleaner approach to extending existing functionality, as compared to overlayering, which many are used to.
Consider extending instead of overlayering next time you need to make a change!
No comments:
Post a Comment
Please don't forget to leave your contact details if you expect a reply from me. Thank you