Code highlighting

Showing posts with label Dynamics 365. Show all posts

Monday, February 09, 2026

Cross references in Dynamics 365 ERP (Finance and Operations) that are somewhat easier to work with

Ever since the migration to Visual Studio as the primary IDE for AX, one of the complaints from developers has been how cumbersome it has become using the cross references, as it was using the default cross references viewer from Visual Studio. 

Engineers looked for ways to make life at least a bit easier by building all sorts of weird extensions and tools. One such tool I have shared in 2016 in the following post: Development tool: Copy 'Find references' results to clipboard (to Excel) in Visual Studio for AX 7.

Well, in the 10.0.47 / PU71 release of Dynamics 365 ERP we finally see some improvements to the Cross References tool.


Here's how it looks now:

Cross References view in Visual Studio


The benefits are:

  • You can now exclude test models, which is great as that used to get in the way a lot when looking for code
  • You can now group the references by model and/or type.

In the image above you can see I've chosen to show the cross references for WHSWorkTable, excluding test models and grouping by the element type. This helped narrow down my search significantly, where I was looking for forms, where work table is one of the data sources.

Some things that are still missing, and will hopefully be added in a future update:

  • Ability to further search over the results
  • Matching the theme to the VS / Windows theme, by supporting Dark mode
  • (very unlikely) Read/Write designation like in old AX versions

Are there any other Cross References features you would like to see? 

Let me know in the comments, and I'll make sure the owning team is made of aware of the request.


Tuesday, November 03, 2020

[Tutorial] Piece by piece receiving process with Advanced Warehouse Management in Dynamics 365 SCM

Introduction

In a recent post (Piece by piece picking process with Advanced Warehouse Management in Dynamics 365 SCM) I described the configuration necessary to allow performing picking in the warehouse by scanning each SKU one by one aka "piece by piece". I suggest you familiarize yourself with this post as I will be re-using the master data setup here. 

In this post, we will be receiving a purchase order with 4 lines, all for DemoShoe product, with similar variants (Size and Color) and quantities, as in the prior example with a sales order. Below you can see the PO lines in full:

Purchase order with 4 lines for DemoShoe

Standard receiving flows like Purchase order item receiving, load item receiving and similar, which receive one purchase order line at a time do not support the piece by piece item entry. 

But there is one mobile device receiving flow that does. It is Mixed License Plate receiving, and below you can see how I have configured it in the application - pretty much a default configuration:

Mixed LP receiving mobile device menu item

Mixed LP receiving is meant for receiving a pallet with mixed items, as described in more detail in our team's blog post. As you can read in the blog post, the initial feature was built with a slightly different purpose, but can be used as well as described in this post.

As before, and very important, we need to configure the bar codes for scanning for all the variants. Exactly the same as in the previous post:

Product variant bar code setup for DemoShoe

Flow

1. We start by scanning in a license plate. This will be the license plate we are going to use for putaway, and as such will be set as the target LP on the created work order.

Enter License Plate

2. As Mixed LP receiving allows receiving items from multiple purchase orders, we then need to enter the PO number we are going to be scanning items from. 

Enter Purchase order number

3. Now we have reached the page where we can start scanning in the barcodes. That's exactly what we are going to do, by scanning in 38White, corresponding to 1 unit of the DemoShoe product variant of size 38 and color White.

Scanning the first product variant

4. After scanning the item we do not see any confirmation, but are presented with the same screen, allowing us to scan the next variant barcode, in this case, 38Black.

Scanning the second product variant

5. At any point in time during the process, we can view the list of items already scanned, change PO number to receiving another purchase order, or complete the scanning for current LP, in our case, when it's full and we want to commence putaway operations. 

LP Complete is what we are going to select below, after having scanned a few more items

Mixed LP receiving - Available actions

6. When completing a license plate, we are first presented with an overview of all the items, and we can still edit the list by adjusting the quantities or removing some of the items from the list. 
(Note. Similar activities can be performed from the web client)

Preview of the scanned items before completing LP

7. When we confirm the list by selecting the checkmark action at the bottom of the page, work will be generated for all the scanned purchase order lines with the respective quantities. This will use the same location directives and work templates as when scanning items in the "standard" way.

Note, that this can take some time, more than it does for a single line receipt, as this will be doing the same action N times, for each PO line we scanned. 

Maybe In future versions of Dynamics 365 SCM we will allow you to configure this process to run "deferred", so that the receiving clerk can move on to the next pallet / purchase order

While the process is running, the app will be blocked and the standard progress icon will display, as shown below:

Progress of creating receiving work

8. Once the process is complete, we will be directed to proceed with scanning the next license plate / purchase order information.

We can review the created work order in the Dynamics 365 SCM web client. 
Nothing unusual here, just a regular work order, as you can see below:

Work order for purchase order

Summary

Now you are familiar with "piece by piece" scanning operations on both inbound and outbound side.
In one of the following blog posts we will review the options available when doing inventory counting operations. 

As for now, let us know if this feature is useful for your business. What's missing? 

Anything else that you would like to see described?

Thanks

Wednesday, October 28, 2020

[Tool] Display contents of an X++ container from SQL database field

Almost 15 years ago AndyD from AxForum blew me away with a post that was giving a glimpse into how the X++ containers are stored in the database. 

Ever since then I had a TODO for myself to write a blog post explaining this in detail and covering the various types that can be stored, basically allowing to review the contents of the container from DB without writing X++ code.

Luckily, today is the day! As they say, 


A colleague of mine, Maciej Plaza, has written a stored procedure, that shows the contents of a container stored in a database field. 

Some inspiration was taken from the following blog post too: http://abraaxapta.blogspot.com/2011/06/accessing-dynamics-ax-containers-from.html

Here's an example of how you could use this to see the batch task's infolog message contents:

declare @bin as varbinary(max);

select top(1) @bin = info from batch where recid = <recid>

exec ##PRINT_CONTAINER @bin

Here is how the output looks like:

Browsing the X++ container contents in SQL


Here is the stored proc (Also available as a file in OneDrive):

CREATE PROCEDURE ##PRINT_CONTAINER @container VARBINARY(MAX)
AS
BEGIN
DECLARE @pos AS int;
SET @pos = 1;
DECLARE @offset AS int;
DECLARE @indent as int;
set @indent = 0;
declare @result as varchar(max);
IF SUBSTRING(@container, @pos, 2) = 0x07FD
	BEGIN
	set @result = '<container>' + char(13);
	set @indent = @indent + 2;
	SET @pos = @pos + 2;
	WHILE @indent > 0
		BEGIN
			IF SUBSTRING(@container, @pos, 1) = 0x00 --STRING
				BEGIN
					set @result = @result + replicate(' ', @indent) + '<string>'
					SET @pos = @pos + 1;
					SET @offset = 0;
					declare @string as varchar(max);
					set @string = '';
					WHILE SUBSTRING(@container, @pos + @offset, 2) <> 0x0000
						BEGIN
							SET @string = @string + 
								CHAR(CAST(REVERSE(SUBSTRING(@container, @pos + @offset, 2)) AS binary(2)))
							SET @offset = @offset + 2;
						END
					SET @pos = @pos + @offset + 2;
					set @result = @result + @string + '</string>' + char(13);
				END
			ELSE IF SUBSTRING(@container, @pos, 1) = 0x01 --INT
				BEGIN
					set @result = @result + replicate(' ', @indent) + '<int>'
					SET @pos = @pos + 1;
					declare @int as int;
					SET @int = CAST(CAST(REVERSE(SUBSTRING(@container, @pos, 4)) AS binary(4)) as int);
					SET @pos = @pos + 4;
					set @result = @result + cast(@int as varchar(max)) + '</int>' + char(13);
				END
			ELSE IF SUBSTRING(@container, @pos, 1) = 0x02 --REAL
				BEGIN
					set @result = @result + replicate(' ', @indent) + '<real>'
					SET @pos = @pos + 1;
					DECLARE @temp as binary(8);
					SET @temp = CAST(REVERSE(SUBSTRING(@container, @pos + 2, 8)) AS binary(8));
					DECLARE @val bigint;
					SET @val = 0;
					DECLARE @dec AS int;
					SET @offset = 1;
					WHILE (@offset <= 8)
						BEGIN
							SET @val = (@val * 100) +
								(CAST(SUBSTRING(@temp, @offset, 1) AS int) / 0x10 * 10) +
								(CAST(SUBSTRING(@temp, @offset, 1) AS int) % 0x10);
							SET @offset = @offset + 1;
						END
					WHILE @val <> 0 AND @val % 10 = 0
						SET @val = @val / 10;
					SET @dec = (CAST(SUBSTRING(@container, @pos, 1) AS int) + 0x80) % 0x100;
					declare @real as real;
					SET @real = CAST(@val AS real);
					WHILE @dec >= LEN(CAST(@val AS varchar)) + 0x80
						BEGIN
							SET @real = CAST(@real AS real) * 10.0;
							SET @dec = @dec - 1;
						END
					SET @dec = (CAST(SUBSTRING(@container, @pos, 1) AS int) + 0x80) % 0x100 + 1;
					WHILE @dec < LEN(CAST(@val AS varchar)) + 0x80
						BEGIN
							SET @real = CAST(@real AS real) / 10.0;
							SET @dec = @dec + 1;
						END
					IF SUBSTRING(@container, @pos + 1, 1) = 0x80
						SET @real = 0 - CAST(@real AS real);
					SET @pos = @pos + 10;
					set @result = @result + @real + '</real>' + char(13);
				END
			ELSE IF SUBSTRING(@container, @pos, 1) = 0x03 --DATE
				BEGIN
					set @result = @result + replicate(' ', @indent) + '<date>'
					SET @pos = @pos + 1;
					DECLARE @year char(4);
					DECLARE @month char(2);
					DECLARE @day char(2);
					SET @year = SUBSTRING(@container, @pos, 1) + 1900;
					SET @month = SUBSTRING(@container, @pos + 1, 1) + 1;
					SET @day = SUBSTRING(@container, @pos + 2, 1) + 1;
					IF LEN(@month) < 2
						SET @month = '0' + @month;
					IF LEN(@day) < 2
						SET @day = '0' + @day;
					declare @date as date;
					SET @date = CAST(@year + '-' + @month + '-' + @day AS date);
					SET @pos = @pos + 3;
					set @result = @result + convert(varchar(max), @date) + '</date>' + char(13);
				END
			ELSE IF SUBSTRING(@container, @pos, 1) = 0x04 --ENUM
				BEGIN
					set @result = @result + replicate(' ', @indent) + '<enum>'
					SET @pos = @pos + 1;
					declare @enum as int;
					SET @enum = CAST(SUBSTRING(@container, @pos, 1) AS int);
					SET @pos = @pos + 3;
					set @result = @result + @enum + '</enum>' + char(13);
				END
			ELSE IF SUBSTRING(@container, @pos, 1) = 0x06 --DATETIME
				BEGIN
					set @result = @result + replicate(' ', @indent) + '<datetime>'
					SET @pos = @pos + 1;
					DECLARE @year2 char(4);
					DECLARE @month2 char(2);
					DECLARE @day2 char(2);
					DECLARE @hour char(2);
					DECLARE @min char(2);
					DECLARE @sec char(2);
					SET @year2 = SUBSTRING(@container, @pos, 1) + 1900;
					SET @month2 = SUBSTRING(@container, @pos + 1, 1) + 1;
					SET @day2 = SUBSTRING(@container, @pos + 2, 1) + 1;
					SET @hour = SUBSTRING(@container, @pos + 3, 1) + 0;
					SET @min = SUBSTRING(@container, @pos + 4, 1) + 0;
					SET @sec = SUBSTRING(@container, @pos + 5, 1) + 0;
					IF LEN(@month2) < 2
						SET @month2 = '0' + @month2;
					IF LEN(@day2) < 2
						SET @day2 = '0' + @day2;
					IF LEN(@hour) < 2
						SET @hour = '0' + @hour;
					IF LEN(@min) < 2
						SET @min = '0' + @min;
					IF LEN(@sec) < 2
						SET @sec = '0' + @sec;
					declare @datetime as datetime;
					SET @datetime = CAST(@year2 + '-' + @month2 + '-' + @day2 + ' ' + @hour + ':' + @min + ':' + @sec AS datetime);
					SET @pos = @pos + 12;
					set @result = @result + @datetime + '</datetime>' + char(13);
				END
			ELSE IF SUBSTRING(@container, @pos, 1) = 0x07 --CONTAINER
				BEGIN
					set @result = @result + replicate(' ', @indent) + '<container>' + char(13);
					SET @pos = @pos + 3;
					set @indent = @indent + 2;
				END
			ELSE IF SUBSTRING(@container, @pos, 1) = 0xFF --CONTAINER END
				BEGIN
					SET @pos = @pos + 1;
					set @indent = @indent - 2;
					set @result = @result + replicate(' ', @indent) + '</container>' + char(13);
				END
			ELSE IF SUBSTRING(@container, @pos, 1) = 0x2D --GUID
				BEGIN
					SET @pos = @pos + 1;
					SET @offset = 0;
					declare @guid as uniqueidentifier
					SET @guid = CAST(CAST(
						REVERSE(SUBSTRING(@container, @pos, 4)) +
						REVERSE(SUBSTRING(@container, @pos + 4, 4)) +
						REVERSE(SUBSTRING(@container, @pos + 8, 4)) +
						REVERSE(SUBSTRING(@container, @pos + 12, 4)
					) AS binary(16))AS uniqueidentifier);
					SET @pos = @pos + 16;
					set @result = @result + replicate(' ', @indent) + '<guid>' + cast(@guid as varchar(80)) + '</guid>' + char(13)
				END
			ELSE IF SUBSTRING(@container, @pos, 1) = 0x30 --BLOB
				BEGIN
					SET @pos = @pos + 1;
					SET @offset = CAST(CAST(REVERSE(SUBSTRING(@container, @pos, 4)) AS binary(4)) AS int);
					SET @pos = @pos + 4;
					declare @blob as varbinary(max);
					SET @blob = CAST(SUBSTRING(@container, @pos, @offset) AS varbinary(max));
					SET @pos = @pos + @offset;
					set @result = @result + replicate(' ', @indent) + '<blob>' + CONVERT(VARCHAR(max), @blob, 2) + '</blob>' + char(13);
				END
			ELSE IF SUBSTRING(@container, @pos, 1) = 0x31 --INT64
				BEGIN
					SET @pos = @pos + 1;
					declare @bigint as bigint;
					SET @bigint = CAST(CAST(REVERSE(SUBSTRING(@container, @pos, 8)) AS binary(8)) AS bigint);
					SET @pos = @pos + 8;
					set @result = @result + replicate(' ', @indent) + '<int64>' + cast(@bigint as varchar(max)) + '</int64>' + char(13)
				END
			ELSE IF SUBSTRING(@container, @pos, 1) = 0xFC --ENUMLABEL
				BEGIN
					SET @pos = @pos + 1;
					DECLARE @value int;
					DECLARE @name varchar(40);
					SET @value = SUBSTRING(@container, @pos, 1);
					SET @pos = @pos + 1;
					SET @offset = 0;
					SET @name = '';
					WHILE SUBSTRING(@container, @pos + @offset, 2) <> 0x0000
						BEGIN
							SET @name = CAST(@name AS varchar(40)) + 
								CHAR(CAST(REVERSE(SUBSTRING(@container, @pos + @offset, 2)) AS binary(2)))
							SET @offset = @offset + 2;
						END
					declare @enumlabel as varchar(max);
					SET @enumlabel = CAST(@name + ':' + CAST(@value as varchar(3)) as varchar(44));
					SET @pos = @pos + @offset + 2;
					set @result = @result + replicate(' ', @indent) + '<enumlabel>' + @enumlabel + '</enumlabel>' + char(13)
				END
			ELSE
			begin
			declare @errormsg varchar(max);
			set @errormsg = 'Unexpected type ' + CONVERT(VARCHAR(1000), SUBSTRING(@container, @pos, 1), 2);
			throw 50000, @errormsg, 1;
			end
		END
	END
print @result
END

Hope this helps!

Saturday, October 17, 2020

[Tutorial] Piece by piece picking process with Advanced Warehouse Management in Dynamics 365 SCM

Introduction

We are often asked - is it possible to configure the system to require the workers on the floor to scan each item they are picking, to ensure a more accurate picking operation where multiple same/similar items need to be picked. This is, for example, very common in the Retail industry, or in smaller distribution centers dealing with apparel or footwear. In this blog post I will demonstrate exactly that, so read on.

Let's quickly go over the setup required.

Setup

In this walkthrough, I will be picking a single sales order (This works just as well for Transfer orders), which has 4 sales lines, each for a different quantity of a product variant varying by size and color. For this example, I've chosen to use a product, which represents a box of shoes. Here is how the order looks:

Piece picking sales order
Sales order with 4 lines

DemoShoe is a product master with Size and Color product dimensions, which has the different product variants defined, and is configured to use Advanced warehouse management.
It has sufficient inventory, some in BULK locations, and some in FLOOR locations. The only difference for this example is whether or not the locations are license plate controlled, and does not have any impact on the core scenario.

On-hand availability for DemoShoe

Now, the important bit - since we plan to be scanning in the products one by one, we need to properly define the bar codes for the different product variants. This is shown below:

Product variant bar code setup for DemoShoe

Obviously, you want to define a different bar code for each product variant.

You also need to set the Quantity/Unit pair according to the picking process - in our case, since we want to be picking one box of shoes with each scan, it will be 1 ea. 

And, very important, you need to enable this bar code for scanning, so that it'll get used when we scan in the value on the mobile device. 

Note. The Scanning field is usually shown on the General tab, I've personalized the page to show it in the grid just for convenience of the screenshot.


After we release the sales order to warehouse (the configuration for this is not relevant for the demo), we get the following work order generated.

Work order for DemoShoes

For processing this work, we will use a standard User directed mobile device menu item. It is configured to generate the target license plate, but that's irrelevant for the demo. 

Mobile device menu item for sales order picking

What is important however is to configure the work confirmation for this menu item, enabling the Piece picking option, as shown below.

Here, I have specified that a maximum of 4 piece picking scans will be required, but if I need to pick more, I can just enter the remaining quantity in full instead. 

I have also enabled location confirmation, and product confirmation is enabled automatically with piece picking (the product confirmation field is the one used to scan in each product variant bar code).

Work confirmation for Pick operation

Flow

1. We start by scanning in the ID of the work order

1. Work ID


2. We are asked to pick the first work line, and start by confirming we have indeed reached the needed location, FL-015

2. Location confirmation

3. As FL-015 is a License plate tracked location, we need to scan in the license plate we are picking from, in this case, LP_Demo_01

3. License plate scan

4. Now is when we reach the product confirmation screen, and where the magic starts. 
We scan in the bar code for the correct variant, 38 Black

4. Picking first shoe box

5. We are brought back to the same screen again, asking us to scan in the product. 
However, if we go to the details tab, we can see something has changed. 
We have now 1 of 2.00 confirmed
That means our input was in fact registered, and we just need to keep scanning the next variant of the 2 required.

5. Piece picking in action - qty confirmed

6. We scan in the second box of 38 Black shoes, and are directed to specify the Target LP we are going to move the items on. In this case, it's automatically generated based on menu item setup, so we just confirm.

6. Target LP

Now, you might have noticed, that the data shown on the main screen wasn't super helpful for us, as we did not immediately at a glance see how many items we have already scan-confirmed. Maybe not an issue, but for the purpose of the demo, let's adjust it, so that the piece picking quantity confirmation is more prominent. 

We can do this by modifying the display priority of the corresponding fields in the Warehouse app field priority form. An example is shown below

Mobile app field priority higher for piece pick qty

I have kept the item description and product dimensions high enough to help visually confirm the size and color of the product being picked.

7. With that out of the way, let's re-enter the picking flow and observe the updated main screen information, when picking the second work line. I've skipped location and license plate confirmation screens

7. New visual for piece picking

8. Now we've reached picking from a non license plate tracked BULK location. The process is exactly the same, minus the scan of the license plate to pick from.

8. Piece picking from a BULK location

9. You might have noticed that the last work line was for a total quantity of 5 pairs of 41 White shoes. 

This exceeds the maximum set during work confirmation, meaning that I am redirected to a different screen after scanning 4 pairs, where I need to enter the remaining quantity using a standard quantity field instead.

Now, 4 is an arbitrary number I set as maximum for this demo. In reality, most will probably have this higher, only to account for certain really larger volume picks.

9. Remaining picking quantity exceeding max piece picking qty

10. Once the remaining quantity is entered (in our case it was just 1 remaining item), all the picks are complete, and we are directed to do the Put of all 10 pairs of shoes we picked.

10. Put to Baydoor

Note that at any point in time in the process, we could switch to the Details tab and manually enter the picking quantity by selecting the little edit icon next to Qty

This is in a way a back door, so I do not recommend that you use it, but thought I would mention it, also to get feedback on how useful this is, and if that's something your company uses on a frequent basis.

Backdoor - Edit Qty field

Summary

That's it. Now you're a master of piece by piece picking in shipping operations when Advanced Warehouse management is used. 

Does this functionality meet the mark? Let us know how you use it and if anything is missing!


In the next post we'll discuss what options are available for piece by piece scans in the receiving warehouse process.

Sunday, December 02, 2018

[Tutorial] Automating Release to Warehouse process through Wave Template configuration

Introduction

Currently many companies resort to manually choosing which shipments need to be added to a wave we are about to process, which is slow and error prone, as the user needs to check up on each of the shipments, understand where it is headed, what types of items are on it, which mode of delivery is used, etc.

Today I would like to show a demo example of how to configure wave templates, as to allow a more optimal distribution of orders, based on, say, delivery mode, or some other cut-off criteria. Automatically, without any user interaction.

Disclaimer

I will not be talking about Automatic release of sales/transfer orders to warehouse in this post. We'll discuss that at a later point in time. Today it is only about making sure certain orders are grouped on a single wave automatically, based on defined criteria, so that they can be processed in the warehouse at the same time. This of course comes hand in hand with automatic release, which would enable a pretty much automatic operation for certain orders

Wave template configuration

Imagine that I would like to accumulate and then process all 2-day shipping orders at once, every second day, so I have the picking done before 4 pm that day when the UPS (or other 3PL) truck arrives to pick them up.
For these orders I want to pick as fast as possible, and the inventory is typically already at the locations and does not need special packaging, so I will not include replenishment and containerization steps into it, and will configure my work template to take the goods straight to the bay doors. 
I would also like to limit the number of shipments on each of the waves to 10, so as to not overwhelm my workers. Instead, I'll release another wave later in the day if necessary.
Generally, I'd like the wave to be processed automatically as soon as 10 shipments have accumulated, but throughout the day my Wave planner might process another wave, depending on the situation.

Here's how my wave template would look for this case:

2 day shipping wave template configuration for warehouse 24

Here's how I have configured the corresponding query:
Note. No need to add any filters on Site or Warehouse, as these will be automatically added.

I want to only look at shipments for Sales orders, and only those that have a 2 DAY shipping mode of delivery. Pretty simple. If I wanted, I could make this much more granular, by adding additional table joins and adding filters on them.

2 day shipping wave template query

Sales orders

Now let's create a couple sales orders, set the Mode of delivery correctly, reserve the inventory and release the orders to the warehouse.

Note. The field that is transferred to the shipment is taken from one of two:

  • Mode field on the sales order, if the Mode of delivery is not filled in.
  • Mode set on the Carrier associated with the specified Mode of delivery.
Mode of delivery specified on Sales order 000910
I only added one simple line for the example, on both sales orders.

Sales line for Sales order 000910

Release to warehouse

When we release the first order to the warehouse, we will create a new shipment, which will have the correct Mode of delivery. We will then proceed to search for a wave template that matches it, based on Site, Warehouse, as well as the defined query. Our newly created wave template should succeed here.
We will not however be able to find an existing Wave in status Created, that would match the Site and Warehouse for the shipment that is also using the same wave template. Which means we will go and create a new Wave
Note. A new wave is created because of the Wave template setting Automate wave creation

When we release the second order to the warehouse though, we will find the wave created above, and because the conditions for adding to the same wave are met, and the wave template has Assign to open waves marked as Yes, we will add the shipment to the found wave instead of creating a new one.

Here's how the resulting wave looks:

Wave created based on the two sales orders


FAQ

Q: What if there is more than one wave in status Created, that was created based on the "right" wave template, and is for the same Site and Warehouse as the newly created shipment? Which wave will the shipment get assigned to?
A: The first of the waves that matches all of the criteria which also does not exceed the thresholds.

Q: Can I use fields directly from the sales order in the wave template query?
A: Yes, but you will need to join to get them. The right way would be to first join the load lines for the shipment, then the order lines related to the load lines, and then the sales order headers related to the sales lines. (Not directly from the shipment, even thought that will work just fine for certain businesses that always have only 1 shipment per 1 order)

Conclusion

As you can see, setting up a wave template that will group multiple shipments and create a new wave if necessary is relatively simple - you just need to get a few of the specifics correct in the setup, and then everything will work like a charm.

In one of the next posts we will combine this configuration with automatic release of sales orders, to achieve full automation of sales order release process, where no user interaction is necessary at all past the sales order creation and confirmation step.

Wednesday, June 06, 2018

[Learning] Transportation management in Dynamics 365 Finance & Operations

I don't talk much about TMS in this blog, so I decided to correct that a bit, and post a set of educational links for those interested in starting up with Transportation management in AX.

If you are already familiar with all the concepts, you probably won't gain that much from these, but for those just starting up, I think it can provide a great overview of what the system can do.

You can start by reviewing the presentation one of my colleagues did a while back.


For a more in depth look, you can go through the TMS learning course (note it is based on AX 2012 R3, but the functionality is largely still the same in the latest release):

https://mbspartner.microsoft.com/AX/CourseOverview/1123

A couple more learning videos are available through the below link:

https://mbspartner.microsoft.com/EOP/Topic/77


Transportation management implementation guide and white papers available can be found through our SCM team blog posts:


And, finally, we have a permanent page on doc.microsoft.com, that you can access through the below link. This is where most of the upcoming functional changes and updates will be communicated going forward.

https://docs.microsoft.com/en-us/dynamics365/unified-operations/supply-chain/transportation/transportation-management-overview


And, of course, if you have further questions after this, please reach out, so we can connect you with the right people to help.

Thanks

Saturday, June 02, 2018

Extensibility: You can now log extensibility requests for Microsoft through LCS

If you weren't living under a rock for the last 2 years, you have already heard about us locking down overlayering starting with the latest release of  Dynamics 365 for Finance and Operations 8.0, and relying solely on the extension model of developing customizations going forward.

But, of course, as this is a moving target, not everything can be done through extensions in the current release.
You will discover that some customizations, which were possible with overlayering, cannot be done through extensions. To enable the same business requirements without overlayering, we have added many extension capabilities and expect to add more going forward. For some customizations that were done with overlayering, you will need to log requests, to make us aware of what you need.
So, how do you log such requests?

Starting in June 2018 you can now log extensibility requests through your LCS project.
Prior to logging a request, make sure you've evaluated alternatives, and have all the necessary information as part of the request for Microsoft to have an easier time adjusting the core code to your specific requirements.

Here's how the "New extensibility support request" form looks like on LCS:

Add a new extensibility request

Follow the below link to find out more details and read through a step-by-step guide on logging extensibility requests:

https://docs.microsoft.com/en-us/dynamics365/unified-operations/dev-itpro/extensibility/extensibility-requests

Saturday, October 07, 2017

Development tutorial: Extensibility: Replaceable in Chain of Command methods

Recently we announced a new and pretty powerful Extensibility feature, wrapping methods with Chain of Command in augmentation classes. This allows to write much cleaner extensions with fewer lines of code, as well as provides some extra capabilities like access to protected fields and methods of augmented object, easier way of ensuring a single transaction scope for standard and extension code, etc.

If you are not yet familiar with this feature, you are missing out. Go read about it:
https://docs.microsoft.com/en-us/dynamics365/unified-operations/dev-itpro/extensibility/method-wrapping-coc

There was one significant restriction applied (by design) to these wrapper methods:

Wrapper methods must always call next

Wrapper methods in an extension class must always call next, so that the next method in the chain and, finally, the original implementation are always called. This restriction helps guarantee that every method in the chain contributes to the result.

However, what this resulted in is a more complex implementation and "workaround-like" solutions in standard code to enable some of the commonly requested extension points, where the ISV/VAR would like to completely replace the standard logic with an alternative implementation that does the same or a very similar operation.


With Platform update 11 we have added a new attribute, which allows Microsoft (on request from multiple partnres), where it is justified, to decorate a particular protected or public method, allowing wrapper methods to not call next on it, replacing the logic of that method.

Here's how it looks:

/// 
/// Attribute used to enable or disable replacing a method in an extension class. 
/// 
/// 
/// Private methods can not be set to be replaceable even with the usage of this attribute.
/// 
public class ReplaceableAttribute extends SysAttribute
{
    boolean isReplaceable;

    public void new(boolean _isReplaceable = true)
    {
        super();
        this.isReplaceable = _isReplaceable;
    }
}

Example

OK, let's now look at an example of how this will be used.

Note. Since the attribute only appeared in PU11, that means that all application released up to and including Spring release 2017 do not have any methods marked with this attribute. It is only now with the Fall release of 2017 that you might see some methods being tagged this way.


Say, an ISV wanted to provide an alternative implementation for looking up Warehouses on a specified Site, more specifically, for the method InventLocation.lookupBySiteIdAllTypes().
One way to solve this could be to add a delegate, invoke it at the beginning of the method, and then check the EventHandlerAcceptResult to see if someone has replaced the implementation, in which case, short-circuit the method execution, so standard logic is not executed.

A potential implementation shown below:

public class InventLocation extends common
{
    public static void lookupBySiteIdAllTypes(FormStringControl _ctrl, InventSiteId _inventSiteId)
    {
        EventHandlerAcceptResult lookupBySiteIdResult = EventHandlerAcceptResult::newSingleResponse();
        InventLocation::lookupBySiteIdAllTypesDelegate(_ctrl, _inventSiteId, lookupBySiteIdResult);

        if (lookupBySiteIdResult.isAccepted())
        {
            return;
        }

        SysTableLookup sysTableLookup = SysTableLookup::newParameters(tableNum(InventLocation), _ctrl);
        ListEnumerator listEnumerator = List::create(InventLocation::standardLookupFields()).getEnumerator();

        while (listEnumerator.moveNext())
        {
            sysTableLookup.addLookupfield(fieldName2id(tableNum(InventLocation), listEnumerator.current()));
        }

        sysTableLookup.parmQuery(InventLocation::standardLookupBySiteIdQuery(_inventSiteId));
        sysTableLookup.performFormLookup();
    }
}

Lookups is one of the common examples, where people might was a complete replacement of the standard logic. Note that by definition that means only one of the ISV solutions can replace it. If two attempt to accept() the result, an error will be shown.
That would typically mean that a logical conflict exists between the two ISV solutions, and the VAR would need to decide which ones to use, or make it configurable somehow.

Now, let's try to see what could be done with the new attribute, if Microsoft were to apply it on this method.

public class InventLocation extends common
{
    [Replaceable]
    public static void lookupBySiteIdAllTypes(FormStringControl _ctrl, InventSiteId _inventSiteId)
    {
        SysTableLookup sysTableLookup = SysTableLookup::newParameters(tableNum(InventLocation), _ctrl);
        ListEnumerator listEnumerator = List::create(InventLocation::standardLookupFields()).getEnumerator();

        while (listEnumerator.moveNext())
        {
            sysTableLookup.addLookupfield(fieldName2id(tableNum(InventLocation), listEnumerator.current()));
        }

        sysTableLookup.parmQuery(InventLocation::standardLookupBySiteIdQuery(_inventSiteId));
        sysTableLookup.performFormLookup();
    }
}

The ISV can now in his model wrap this method in an augmentation class, provide his own implementation, and avoid calling next():

Important. 
We recommend to always make the call conditional, so that your own logic that is not calling next is only invoked for your specific case. This will make you a good citizen, that can co-exist with other ISV solutions also wrapping the same method.


[ExtensionOf(tableStr(InventLocation))]
public final class MyPU11InventLocationTable_Extension
{
    public static void lookupBySiteIdAllTypes(FormStringControl _ctrl, InventSiteId _inventSiteId)
    {
        const str MySpecialWarehouseCtrlName = 'MySpecialWarehouseCtrl';
        if (!_inventSiteId || _ctrl.name() == MySpecialWarehouseCtrlName)
        {
            // Your own logic
            _ctrl.performTypeLookup(extendedTypeNum(InventLocationId));
        }
        else
        {
            next lookupBySiteIdAllTypes(_ctrl, _inventSiteId);
        }
    }
}

Pretty easy and neat, huh?

Missing an extension point? Log it!

Again, remember, that in order to skip calling next, the method needs to be marked by Microsoft as Replaceable.
If you need a particular method to be Replaceable, or if you in general need an extension point that is not available in the latest available release, please follow the instructions outlined here to create an extensibility request for us.


Links


To review the list of features included in Platform update 11, see the What's new or changed topic and refer to the KB article for details about the customer found bug fixes included in this update.

Development Tutorial: Extensibility: Adding a table display/edit method and showing it on a form in PU11

In my previous post I described the capabilities of the Dynamics 365 FOE platform update 10, when it comes to working with display/edit methods.

In Platform Update 11 a few improvements came out, which I will describe below (with an example).

Let's use the same example as in my previous post, and add a new display method showing the internal product name for a selected product - we'll compose it by appending some text to the product search name.


Step 1 - Create a table extension and add a new display method to it - New recommended approach


All the approaches described in the previous post are still applicable, but are, in my opinion, not as intuitive as the below, so I'd recommend to always use the below approach.

[ExtensionOf(tableStr(EcoResProduct))]
public final class MyPU11_EcoResProductExtensionOfTable_Extension
{
    [SysClientCacheDataMethod]
    public display Name myInternalProductName()
    {
        return "PU11: " + this.SearchName;
    }

    // This is same as in PU10
    [SysClientCacheDataMethod]
    public static display Name myInternalProductNameStatic(EcoResProduct _ecoResProduct)
    {
        return "PU11 static: " + _ecoResProduct.SearchName;
    }
}
K/code>

OK, so what do we have here?
A simple instance method, no redundant arguments, access to table fields and methods through this.
Just as with overlayering, there's really no difference.

NoteThe logic of the method is not really important - you'd have your fields used here, most probably, but for the sake of the example I just use SearchName field.

Step 2 - Add the method to a form through a table field group


So now let's see another thing, which was not possible before PU11.

Let's create an extension for the metadata changes of the EcoResProduct table, and add a new Field Group. After that we'll put our new display method in it, as shown below.

Select the new display method as the source for the new field group field.
As you can see from the image above, you can now use the drop-down, and it will show you all the display/edit methods created in Extension/Augmentation classes as well as the standard ones.
The syntax is the same as described last time:
  • :: for static methods
  • . for instance methods (new)
All that's left is to add the new field group onto a form.

Step 3 - Add the methods to a form through extension


Same as before, we create a form extension, and add the new fields to it.
With field groups it is as easy as with overlayering - you can just drag and drop the new field group from the DataSources\EcoResProduct node onto the Design of the form, and it will create the new group and sub-controls, and set the appropriate properties on them, as shown below:

Add new field group onto the form extension
As easy as that.

You can also add the fields bound to the new display methods directly, as shown before. Except now you can also use the instance display/edit methods, which wasn't available earlier.

Add an instance extension display method to a form


Limitations

  • The drop-down for display methods does not show the extension methods, as with field groups. This should be addressed in one of the upcoming updates.
  • You are still not able to declare the display method on the form itself, or on the form data source.

Conclusion

Some last words: The future is bright! :) 
The tooling is getting better with every release, and thanks to the monthly updates and binary compatibility of the releases, new innovation from Microsoft is just a month away!

Links

You can download the project from the example from my OneDrive.

To review the list of features included in Platform update 11, see the What's new or changed topic and refer to the KB article for details about the customer found bug fixes included in this update.

Thursday, September 28, 2017

Development Tutorial: Extensibility: Adding a table display/edit method and showing it on a form in PU10

One of the super common tasks for an application developer working to address customer requirements is adding display methods showing some additional customer-specific information on existing forms.

Usually you would overlayer the corresponding table and form and insert the missing method. Overlayering is not an option soon, however it is possible to do the same using only Extensions.

As an example, let us add a new display method showing the internal product name for a selected product - we'll compose it by appending some text to the product search name.

Step 1 - Create a table extension and add a new display method to it - Option 1


As you know, there are two ways to create extension classes now, so let's see both ways in action.
Here we'll look at the "old" way, where we create an actual extension class (as in .NET), so it must be static, and the display method must be static as well, and take the record as the first argument.

Here's how it looks for my example:

/// 
/// Extension class for EcoResProduct table.
/// 
public static class MyPU10_EcoResProductTable_Extension
{
    [SysClientCacheDataMethod]
    public static display Name myInternalProductName(EcoResProduct _ecoResProduct)
    {
        return 'IntName: ' + strReplace(_ecoResProduct.SearchName, ' ', '');
    }
}

As you can see, we can define the above method and it will compile even though normally declaring a static display method is not allowed by the compiler.
We can also decorate the method with attribute, like I have done here by applying the display method caching attribute.
The logic of the method is not really important - you'd have your fields used here, most probably, but for the sake of the example I just use SearchName field.

Step 2 - Create a table extension and add a new display method to it - Option 2


So, another "new" way to extend a table is through an augmentation class, using the ExtensionOf attribute. This is shown below for my example:


/// 
/// Extension class for EcoResProduct table.
/// 
[ExtensionOf(tableStr(EcoResProduct))]
final class MyPU10_EcoResProductExtensionOfTable_Extension
{
    public static display Name myInternalProductName(EcoResProduct _ecoResProduct)
    {
        return "Alt: " + _ecoResProduct.SearchName;
    }
}

As you can see, this again is a static method - declaring it as an instance method will compile and would allow you to reference the record through this, but you will not be able to use it as a display method on the form as of today.
The method also needs to take the record as the argument.
It, of course, can also be decorated with the SysClientCacheDataMethod attribute, as in the first example.

Step 3 - Add the methods to a form through extension

Note - Limitation

You cannot as of today add the newly created display methods to a field group on the table. It will compile, but the control will not show up on the form if you add the field group to it.


First off, we'll need to create an extension of the EcoResProductDetails form in the desired model.
Then we'll add a new tab page to it and place two new String controls into it.

Now, the trick is with how to specify the display method name in Properties.

See the example below:

Specify properties for form string control to bind it to a table data method
As you can see, the trick is to specify the full name, including the class name and the method name with the static method delimiter in the format:

<class name>::<static method name>

This is only supported for table methods, so you won't be able to do the same for a Form Data Source, for example.

Result

Here's how our new awesome display methods look at run-time:

Additional information shown through display methods on Product details form

Download the project

You can download it from my OneDrive here.

What's next

In an upcoming platform update we hope to provide a much more intuitive way of adding display methods, however the above approach will keep being supported.
Stay tuned for an update!

Monday, September 04, 2017

Development tutorial: insert_recordset using the Query class

Introduction

I am sure most of you are familiar with set-based X++ CUD operators: insert_recordset, update_recordset and delete_from. They allow performing database operations with a large number of records in a single roundtrip to the server, instead of a row-by-row type of operation, which depends on the number of rows being processed. As a result, they can provide a very significant boost in overall performance of a selected flow.

If not familiar or just need a refresher, you can read more about it by following the link to MSDN.

Problem statement

There's however one significant drawback with these operators - they are all compile-time constructs, so they lack the flexibility of the flow modifying the database request before it is set based on runtime state of the flow.

And, once the application is sealed, that will mean there is no way to modify the request even at compile-time, as X++ statements are not extensible.

Solution

In Microsoft Dynamics AX 2012 R3 a static method was added on the Query class, that allows to solve the two problems above for insert_recordset. This is of course now also available in Microsoft Dynamics 365 for Finance and Operations: Enterprise edition.

Note: update_recordset and delete_from are still not supported through the Query class.

Example

Imagine that we need to write a function that would copy selected sales order line information into a sales order line history table for one or more orders.

1. Data model

Here's how the data model for this table is defined in this example:
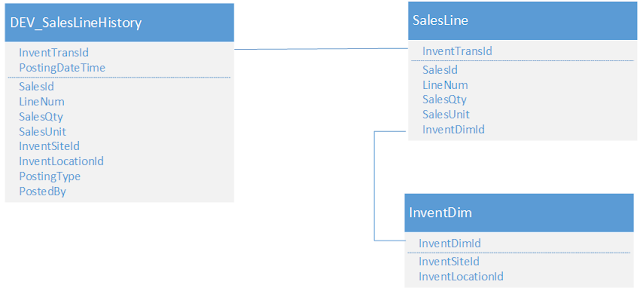
DEV_SalesLineHistory data model diagram

2. New DEV_SalesLineHistory table in Visual Studio

And here's how the new table looks in Visual Studio (I created a new model for it in a separate package dependent on Application Suite):

DEV_SalesLineHistory table in Visual Studio
DEV_SalesLineHistory table
Note I skipped all stuff non-essential to this example

3. Copy function through regular X++ insert_recordset statement

Let's first write the statement for inserting the history records using the regular insert_recordset operator:

public class DEV_Tutorial_InsertRecordset
{
    public static Counter insertXppInsert_Recordset(SalesId _salesId)
    {
        DEV_SalesLineHistory    salesLineHistory;
        SalesLine               salesLine;
        InventDim               inventDim;

        JournalPostedDateTime   postedDateTime = DateTimeUtil::utcNow();
        JournalPostedUserId     postedBy = curUserId();
        SalesDocumentStatus     postingType = DocumentStatus::PackingSlip;

        insert_recordset salesLineHistory
        (
            SalesId,
            LineNum,
            InventTransId,
            SalesQty,
            SalesUnit,
            InventSiteId,
            InventLocationId,
            PostedDateTime,
            PostedBy,
            PostingType
        )
        select SalesId, LineNum, InventTransId, SalesQty, SalesUnit from salesLine
            where salesLine.SalesId == _salesId
            join InventSiteId, InventLocationId, postedDateTime, postedBy, postingType from inventDim
                where inventDim.InventDimId == salesLine.InventDimId;

        return any2int(salesLineHistory.RowCount());
    }
}

As you can see, we do a simple select from SalesLine, specifying the exact fields, joined to selected fields from InventDim, where the field list also contains a few local variables to populate into the rows being inserted.
This is the standard syntax used with X++ insert_recordset statement, which all of you are familiar with.

4. Method signature for Query::insert_recordset()

Now let's convert the above to a Query, and call Query::insert_recordset() instead.
This method accepts three arguments:
  • An instance of a table record. This is where data will be inserted into. We can then use this variable to ask how many rows were inserted, for example.
  • An instance of a Map(Types::String, Types::Container), which defines the mapping of the fields to copy. In X++ operator, this had to be based on the specific order in the field selection lists in the select statement. 
    • The map key is the target field name.
    • The value is a container, which defines a pair of values:
      • the unique identifier of the QueryBuildDataSource object points to the table to copy the value from
      • the field name on the above data source to copy the value from
  • An instance of a Query class, which defines the select statement for the data, similar to what you see in the X++ version above.

As you can see from the above, it does not account for literals, as we did with variables in the X++ operator example.
That is currently not supported with this API.
We can however solve this through a use of a "temporary" table, as suggested below.

5. Define a new table to store calculable literals

Let us define a new table that will store the data required by our insert statement. That means it needs to contain four fields:
  • PostedDateTime
  • PostedBy
  • PostingType
  • SalesId - we'll use this to join to SalesLine. This could be sessionId or whatever is required to ensure concurrency and uniqueness
Here's how the table would look in Visual Studio designer:

DEV_SalesLineHistoryPostingDataTmp table definition

We can now populate this table with the required values and join it to our query.
After executing the bulk insert we can then delete the inserted row (if necessary).


Another possible implementation here could be to use a View, with computed  columns for the different literal values needed. You could select from a table that has only 1 row, like InventParameters or the like. This is however less flexible, as it'll be compiled in, while with a "temporary" table you could determine the values at runtime.

6. Write up the code using the Query::insert_recordset() method

Now we are all set to write the necessary code. It would look like below:

public class DEV_Tutorial_InsertRecordset
{
    public static Counter insertQueryInsert_Recordset(SalesId _salesId)
    {
        DEV_SalesLineHistory    salesLineHistory;
        
        Query query = new Query();
        QueryBuildDataSource qbdsSalesLine = query.addDataSource(tableNum(SalesLine));
        qbdsSalesLine.addSelectionField(fieldNum(SalesLine, SalesId));
        qbdsSalesLine.addSelectionField(fieldNum(SalesLine, LineNum));
        qbdsSalesLine.addSelectionField(fieldNum(SalesLine, InventTransId));
        qbdsSalesLine.addSelectionField(fieldNum(SalesLine, SalesQty));
        qbdsSalesLine.addSelectionField(fieldNum(SalesLine, SalesUnit));
        qbdsSalesLine.addRange(fieldNum(SalesLine, SalesId)).value(queryValue(_salesId));
        QueryBuildDataSource qbdsInventDim = qbdsSalesLine.addDataSource(tableNum(InventDim));
        qbdsInventDim.addSelectionField(fieldNum(InventDim, InventLocationId));
        qbdsInventDim.addSelectionField(fieldNum(InventDim, InventSiteId));
        qbdsInventDim.relations(true);
        QueryBuildDataSource qbdsPostingData = qbdsInventDim.addDataSource(tableNum(DEV_SalesLineHistoryPostingDataTmp));
        qbdsPostingData.addLink(fieldNum(SalesLine, SalesId), fieldNum(DEV_SalesLineHistoryPostingDataTmp, SalesId), qbdsSalesLine.name());
        qbdsPostingData.addSelectionField(fieldNum(DEV_SalesLineHistoryPostingDataTmp, PostedDateTime));
        qbdsPostingData.addSelectionField(fieldNum(DEV_SalesLineHistoryPostingDataTmp, PostedBy));
        qbdsPostingData.addSelectionField(fieldNum(DEV_SalesLineHistoryPostingDataTmp, PostingType));

        Map targetToSourceMap = new Map(Types::String, Types::Container);
        targetToSourceMap.insert(fieldStr(DEV_SalesLineHistory, SalesId),           [qbdsSalesLine.uniqueId(), fieldStr(SalesLine, SalesId)]);
        targetToSourceMap.insert(fieldStr(DEV_SalesLineHistory, LineNum),           [qbdsSalesLine.uniqueId(), fieldStr(SalesLine, LineNum)]);
        targetToSourceMap.insert(fieldStr(DEV_SalesLineHistory, InventTransId),     [qbdsSalesLine.uniqueId(), fieldStr(SalesLine, InventTransId)]);
        targetToSourceMap.insert(fieldStr(DEV_SalesLineHistory, SalesQty),          [qbdsSalesLine.uniqueId(), fieldStr(SalesLine, SalesQty)]);
        targetToSourceMap.insert(fieldStr(DEV_SalesLineHistory, SalesUnit),         [qbdsSalesLine.uniqueId(), fieldStr(SalesLine, SalesUnit)]);
        targetToSourceMap.insert(fieldStr(DEV_SalesLineHistory, InventLocationId),  [qbdsInventDim.uniqueId(), fieldStr(InventDim, InventLocationId)]);
        targetToSourceMap.insert(fieldStr(DEV_SalesLineHistory, InventSiteId),      [qbdsInventDim.uniqueId(), fieldStr(InventDim, InventSiteId)]);
        targetToSourceMap.insert(fieldStr(DEV_SalesLineHistory, PostedDateTime),    [qbdsPostingData.uniqueId(), fieldStr(DEV_SalesLineHistoryPostingDataTmp, PostedDateTime)]);
        targetToSourceMap.insert(fieldStr(DEV_SalesLineHistory, PostedBy),          [qbdsPostingData.uniqueId(), fieldStr(DEV_SalesLineHistoryPostingDataTmp, PostedBy)]);
        targetToSourceMap.insert(fieldStr(DEV_SalesLineHistory, PostingType),       [qbdsPostingData.uniqueId(), fieldStr(DEV_SalesLineHistoryPostingDataTmp, PostingType)]);

        ttsbegin;
        
        DEV_SalesLineHistoryPostingDataTmp postingData;
        postingData.PostedDateTime = DateTimeUtil::utcNow();
        postingData.PostedBy = curUserId();
        postingData.PostingType = DocumentStatus::Invoice;
        postingData.SalesId = _salesId;
        postingData.insert();
        
        Query::insert_recordset(salesLineHistory, targetToSourceMap, query);

        delete_from postingData 
            where postingData.SalesId == _salesId;

        ttscommit;

        return any2int(salesLineHistory.RowCount());
    }
}

As you can see, the first part of the code builds a query using the QueryBuild* class hierarchy. The query is identical to the above select statement, with the addition of another join to our "tmp" table to retrieve the literals.
The second part populates the target to source Map object, which maps the fields to insert into to their source.
The third part actually invokes the operation, making sure we have the record populated in our "tmp" table beforehand.

Note. Because the first argument is the record we insert into, we can use it to get the RowCount(), telling us how many records have been inserted.

7. Extensibility aspect

Leaving the code just like it is does not actually make it extensible, as the partners would not be able to add additional fields to copy, or additional conditions/joins to the query. To accomplish this, we'd need to break the logic out into smaller methods with specific responsibilities, or add inline delegates to do the same. Generally speaking, you should always favor breaking the code down into simpler methods over delegates.
I've not done this in the example, as that's not the purpose, but you should follow these guidelines in production code.

8. Execute and test the code

We can execute these methods now, but first we need to ensure we have a test subject, aka a Sales order to practice with. Here's the one I used in the example:

A sales order with 3 order lines
And here's the Runnable Class that invokes the two methods above:

class DEV_Tutorial_InsertRecordset_Runner
{        
    public static void main(Args _args)
    {        
        const SalesId SalesId = '000810';

        if (SalesTable::exist(SalesId))
        {
            Counter xppInsert = DEV_Tutorial_InsertRecordset::insertXppInsert_Recordset(SalesId);
            Counter queryInsert = DEV_Tutorial_InsertRecordset::insertQueryInsert_Recordset(SalesId);

            strFmt('Tutorial Insert_Recordset');
            info(strFmt('Inserted using X++ insert_recordset = %1', xppInsert));
            info(strFmt('Inserted using Query::insert_recordset() = %1', queryInsert));
        }
    }

}

You can download the full project here.


Hope this helps! Let me know if you have any comments.